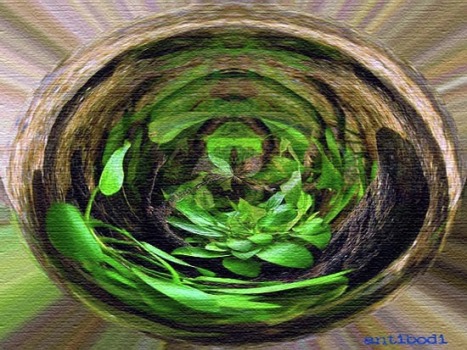
Antibodi: journey between aquarium and nature.
Nature gathers in itself something absolutely fascinating: the cycle of life, that allows us, and billions of other forms of life, since forever to exist and to procreate, a world regulated by laws at times very complicated, where there is ample space for random facts.
I believe that for most people into aquariums, the idea of creating a small world in five pieces of glass represents the desire to be able to observe a piece of nature and its biorhythms within the intimacy of his own home, an environment where fish and plants can live in harmony side by side.
I believe that for most people into aquariums, the idea of creating a small world in five pieces of glass represents the desire to be able to observe a piece of nature and its biorhythms within the intimacy of his own home, an environment where fish and plants can live in harmony side by side.
I wrote this article trying to include as many photos as possible, to allow you to follow the evolution of the tank, not only through the written concepts, but also through photos that show all the details step by step.
My idea of a tank has always been that of creating something that, in due time, can create a balance between the random of the shapes, colors, spaces and something programmed and studied regarding the choice of the guests that live in it.
After several months of attempts in assembling different aquariums I decided to try to create a tank that could represent the ideal connection between the “do it yourself” and the use of materials found in the natural environment.
Part I: do it yourself and backwall.
One of the elements that strongly characterize the set up ofa tank is the back wall: I always had the strong desire to recreate the shore of a river.
That was my goal.
The shore, either muddy, rocky or covered by plants, is notonly choreographically interesting but can offer, both in nature and in a tank, a protection for fish or invertebrates, hiding places and shaded areas where they can procreate or reduce the stress that always, no matter how big the tank is, can modify their behavior turning them into more aggressive animals or inducing several types of diseases.
My previous experiences with different types of wood, organic and inorganic materials, and commercialized products allowed me to choose the more appropriate without having to repent of my decision after introducing them in the tank.
I also tried to keep the production costs low, trying to create a product nice, realistic, and functional without having to spend too much money, letting fantasy, creativity, and patience take control during the work.
Following is the description step by step of the Antibodi’s wall construction.
The products that I bought in a Brico center (an Italian hardware store) are the following:
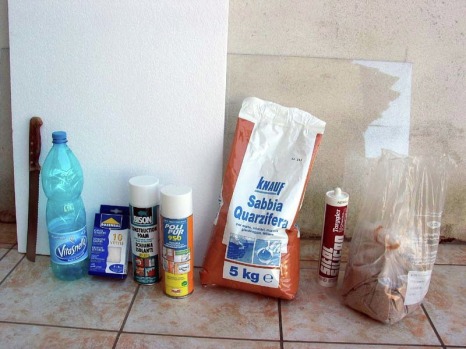
Vinyl elastic gloves. The polystyrene gloves are fine as well, in a package of 10, even though it is easier to find them in packages of 100 (no problem, you can always find a use for them). Just to be more specific I used 2 pairs to work with the silicon and about ten pairs to mold and set the expanse polyurethane for all the creation that I made. Be careful because polyurethane is rather sticky and could create some problems to your hands if you don’t use those useful precautions. Try to buy the right size of gloves, they have to be tight, otherwise it will be difficult to work the polyurethane, that after a short while hardens and causes problems with gloves that are too big.
The expanse polyurethane is a rather common building product (even in the “do it yourself"), so it is easy to find in hardware stores. Initially I bought 2 packages of 25 liters each. I realized then that it would not have been enough and I bough two more (50 liters each) that I used almost completely. Probably, having being mixed with different materials, it didn’ts well much, and I needed an extra amount, but at the same time it helped in making the back wall more solid.
The expanse polyurethane is a rather common building product (even in the “do it yourself"), so it is easy to find in hardware stores. Initially I bought 2 packages of 25 liters each. I realized then that it would not have been enough and I bough two more (50 liters each) that I used almost completely. Probably, having being mixed with different materials, it didn’ts well much, and I needed an extra amount, but at the same time it helped in making the back wall more solid.
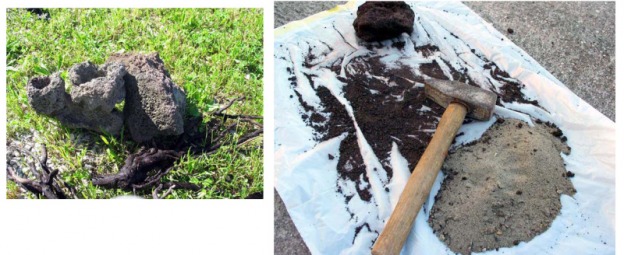
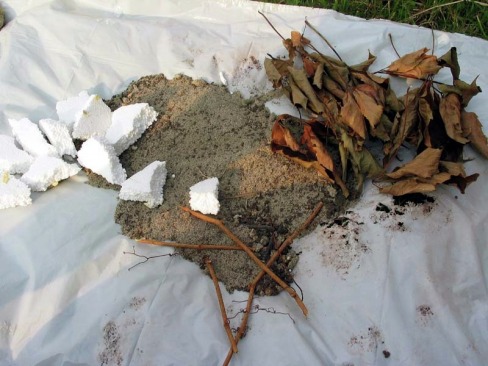
Quartz sand is used in buildings, easy to find, rather grayand very fine.
It is important to use different kinds of sand or powder,both in size and color.
This will help you create different shades of color anda more realistic look.
For this reason I used at the same time grayish quartz sandand another sand (previously bought), similar in size but rather yellowish incolor. I also used lava powder, very nice looking, rather dark or reddish incolor.
The silicon must be acetic and not the anti-mold type, Ibought it black, but since you use I only to attach the polystyrene and the PVCbottle to the Polyver (sealing polyurethane) leaf, it can also be white ortransparent, it doesn’t matter, it will be entirely covered by the othermaterials.
A polyver leaf of the right size and about 3 mm thick, it can be adapted to the size of the tank’s back wall, and polystyrene that you will cut into pieces.
I bought them both in the same hardware store.
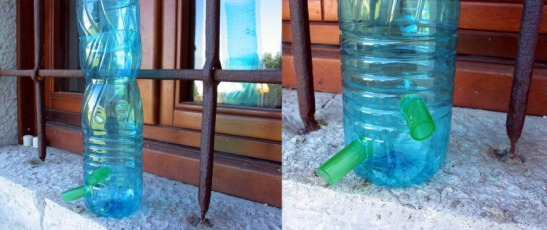
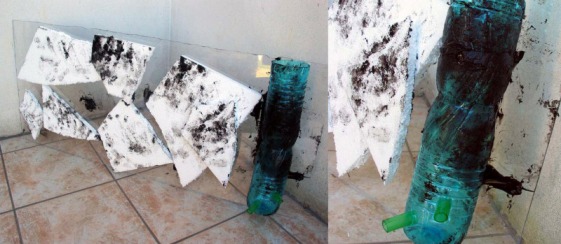
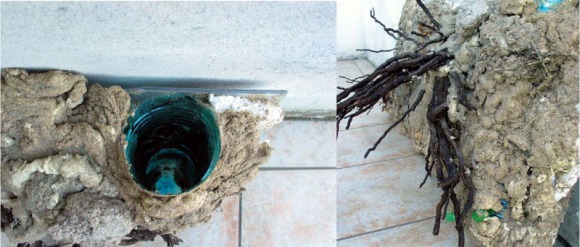
Certainly it has been useful to hide as mush as possible the instruments that will be used for the normal functioning of the tank, like the heater and the entrance tube for the external filter.
I thought at a functional and easy to make solution, took tow bottles of mineral water (one and a half liter each), I cut them as showin the photo and adapted them to create a sort of a tube into which to put the instruments. You can also use the usual building tubes (orange or white), sealed at the bottom.
I attached it to the Plexiglas wall with silicon, leaving the top open. In the sealed bottom I opened two holes with a red-hot tool, where I put two PVC tubes to let the water flow. In this way I managed to both create an easy solution to the instrument hiding problem, and at the same time I created a bump in the back wall, giving a greater depth to it and a sense of greater random aspect to the wall.
When I was attaching the bottle with silicon, I also attached pieces of polystyrene, creating some dynamic effect to the wall, in order to avoid having to use later more material. Polystyrene is cheap, easy to work with and very light.
When I first started to describe my adventure, I told you about my interest in searching for natural materials: soil, sand, leaves, small branches, roots, rocks and pebbles, dried grass, are all materials that in due time form the shores of rivers and lakes, and I strongly wanted to use them, trying to imitate the natural process.
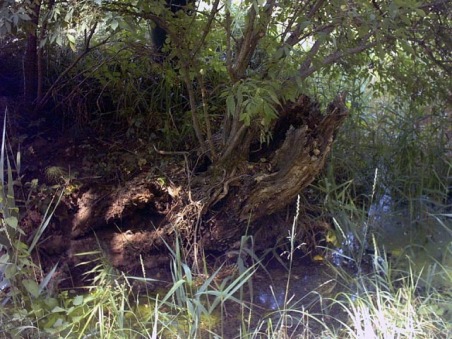
The photo taken near my home show the shore of a small creek with reeds and a very choreographic wood.
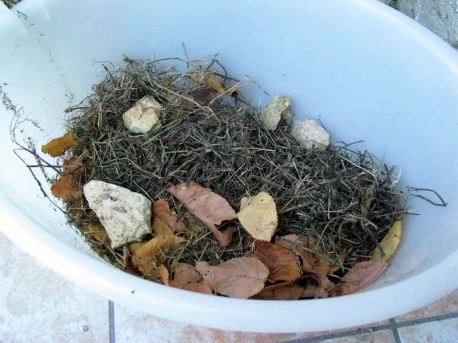
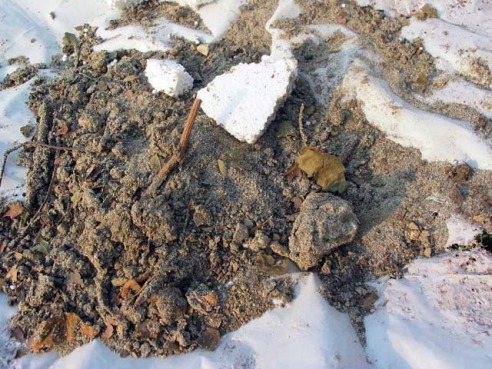
In the different phases of covering the back wall I attached to the expanse polyurethane all those materials, trying to do so in a random way, fixing some of them with small amounts of polyurethane.

In the photo you can see some of the materials I collected: leaves, rocks, dried grass, that I didn’t wash, and that I tried to insert by breaking them in small pieces whenever possible, or, at the end, all in one piece.

At first I recommend to start playing with polyurethane and sand. Put the latter on a flat surface (I used a left over piece of polystyrene) spray the polyurethane (about a first), trying not to spread around the sand, and start molding it.
Fill little by little the entire wall, keeping the surface irregular (thanks to the glued polystyrene that you have previously used).
I suggest to start from on side and to use the gray sand (the other can be used later to create shades of color).
Fill little by little the entire wall, keeping the surface irregular (thanks to the glued polystyrene that you have previously used).
I suggest to start from on side and to use the gray sand (the other can be used later to create shades of color).
I operated by mixing the different materials with sand and polyurethane, layer after layer, don’t be afraid, the layers will become more compact, so you can operate in different phases. With a little patience (not even that much!) lots of fantasy and creativity I sat on the ground, and taking advantage of a beautiful sunny day, with some breeze, I finished the first part of the wall in about two hours.
Be careful! Keep your gloves on and try not to breath the product, work outdoor if possible.
Be careful! Keep your gloves on and try not to breath the product, work outdoor if possible.
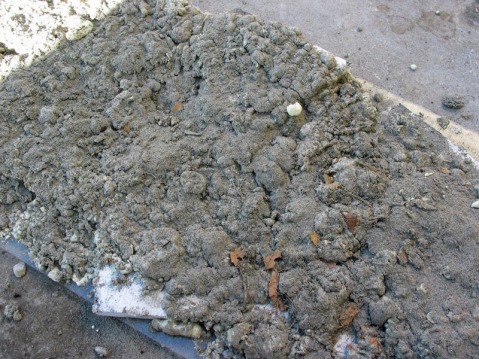
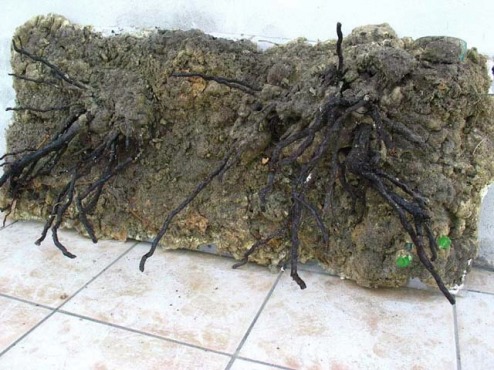
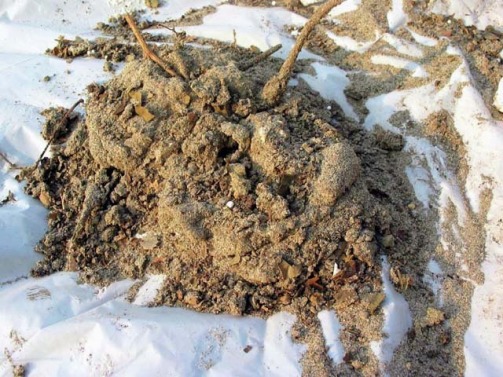
The poliver leaf has been completely covered with the materials. All the materials have been pasted together, including some pieces of roots and gravel I found on the site.
I have to admit that when it all starts to get into a shape you not only are very motivated to continue and to finish soon, in order to put it quickly in the tank, but you also are satisfied by your work and start imagining how to place the plants and the other materials in the tank.
I recommend you to operate at random, not to press the paste too much, give some little bumps to it with your fingers if you want some parts to be more flat. Remember that you are trying to create something as realistic as possible.
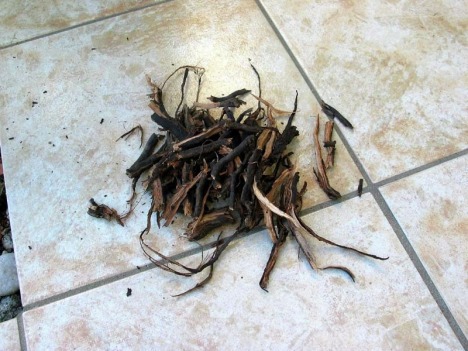
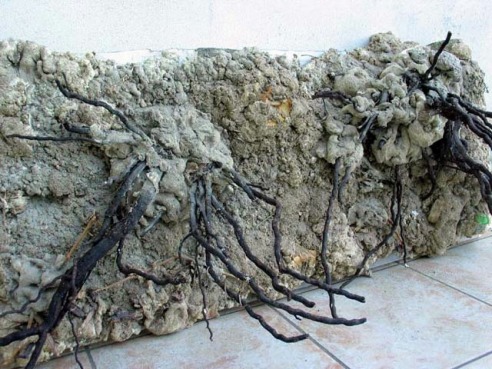
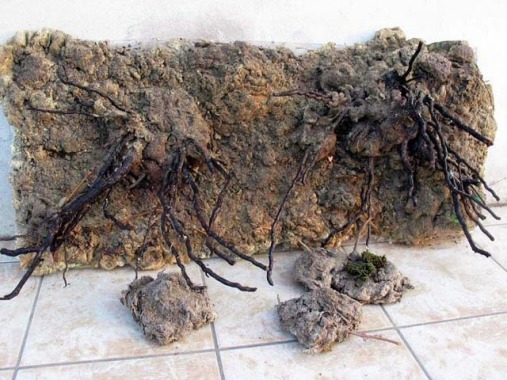
At times it happens to admire the photo of a river, with its shores covered by plants, rocks, roots. I saved the latter since a few months, and put them aside for the “big day” since I had admired them a lot.
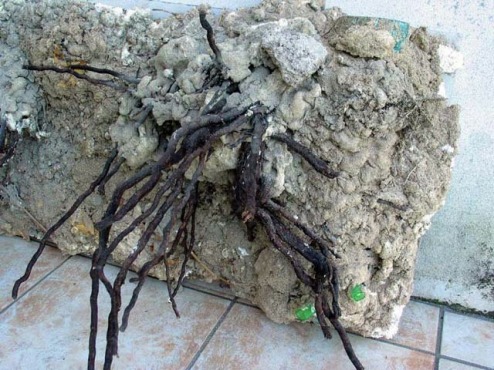
They are roots of vine, a deep walnut brown, not too thick, of various length, that I put in groups of 2 or 3 elements within about ten centimeters from the sides of the wall.
I have to admit that when it all starts to get into a shape you not only are very motivated to continue and to finish soon, in order to put it quickly in the tank, but you also are satisfied by your work and start imagining how to place the plants and the other materials in the tank.
I recommend you to operate at random, not to press the paste too much, give some little bumps to it with your fingers if you want some parts to be more flat. Remember that you are trying to create something as realistic as possible.
At times it happens to admire the photo of a river, with its shores covered by plants, rocks, roots. I saved the latter since a few months, and put them aside for the “big day” since I had admired them a lot.
They are roots of vine, a deep walnut brown, not too thick, of various length, that I put in groups of 2 or 3 elements within about ten centimeters from the sides of the wall.
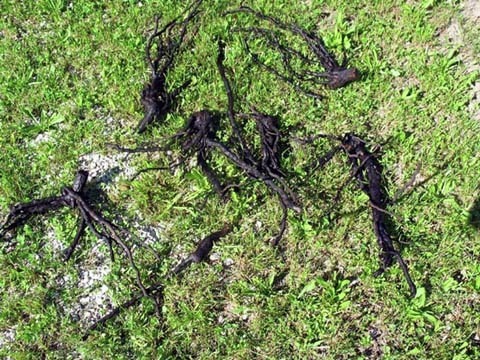
The roots stayed a few weeks in running water, having had care to cover them with water completely.
I fixed them to the wall when the greatest amount of the work was done. I attached them with polyurethane in the spots I had selected, trying to keep them in the right position with rocks, letting the polyurethane dry. It doesn’t take long, maybe 10 minutes, till the solidity is sufficient.
I fixed them to the wall when the greatest amount of the work was done. I attached them with polyurethane in the spots I had selected, trying to keep them in the right position with rocks, letting the polyurethane dry. It doesn’t take long, maybe 10 minutes, till the solidity is sufficient.
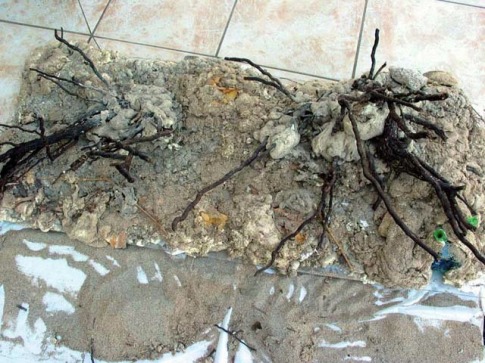
Don’t worry if the polyurethane used to fix the roots (it happened to me too) will be of a different color and shape, sort of out of place with the rest of the wall. The final touches, also using the plastivel (a plastifying paint spray), will be easy to make.
Good! The wall is done, or at least the greatest part of the creative work I mean, because after wards, other than final touches in the coloring or the adding of a few more materials, we will also have to protect it, as much as possible, using a non toxic transparent paint, the plastivel.
Good! The wall is done, or at least the greatest part of the creative work I mean, because after wards, other than final touches in the coloring or the adding of a few more materials, we will also have to protect it, as much as possible, using a non toxic transparent paint, the plastivel.
You can lift the wall and let the excess sand to fall, dust then the wall in order to eliminate the excess material. Don’t worry if the green entry tubes are visible, they will be easy to hide with some plants of a rock, but I decided to give them some space for easy access.
The polyurethane mixed with all the materials took a few hours to become solid and compact, but I recommend waiting a few days before passing to the following construction steps.
The poliver wall obviously became a solid block with the rest allowing an easier maneuvering of the structure and an easier and safer introduction in the tank.
You can see in the photo that I tried to let the roots stick out in a random way. Some of them will almost reach the front wall, and I believe that it will add some depth to the environment.
On the left view from the top you can notice the space for the instruments, keep it in mind before choosing the bottles to use. I used two bottles I had handy at the moment, but you can try to find a unique bigger bottle, maybe a two liter bottle will be enough.
On the left view from the top you can notice the space for the instruments, keep it in mind before choosing the bottles to use. I used two bottles I had handy at the moment, but you can try to find a unique bigger bottle, maybe a two liter bottle will be enough.
Here is the final result for the first phase of the creation. I also put some lava rocks at the bottom to figure out how the look would be with the wall and the decorations in the tank.
After about two days, I started the following step, I pulverized a piece of lava rock (I chose one neither too reddish not too dark) and I mixed it with the left over quartz sand.
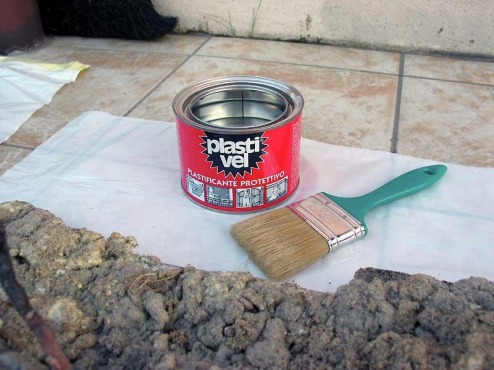
In a hardware store I bought a liquid plastivel can and a spray bottle, and, of course, a brush. I started painting the wall with light brushing, trying neither to break nor to move the delicate dry leaves or the small branches sticking out. I had to give careful touches with the tip of brush in the most difficult zones, such as between the roots. This wasn’t too difficult, but it is certainly not easy to cover the entire surface with plastivel, that’s why I later used the spray as well.

I want to remark that the color after using the plastivel will slightly change, in my case they became darker, also because I used lava powder, so if you want to keep the wall very light in color, use very light sand and other elements.
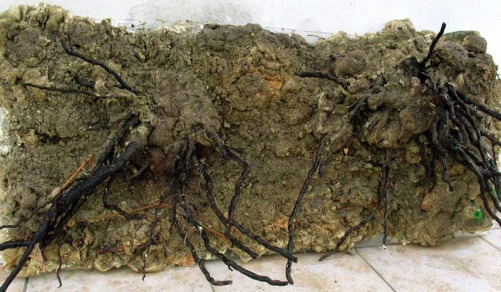
I wanted to show you both of the images, the original and the negative, to let you see how easy and realistic it is to mix the materials thanks to the polyurethane and to create a surface that will remind you of the elements easily found in nature.
You can also notice how irregular the surfaces.
I wanted to show you both of the images, the original and the negative, to let you see how easy and realistic it is to mix the materials thanks to the polyurethane and to create a surface that will remind you of the elements easily found in nature.
You can also notice how irregular the surfaces.
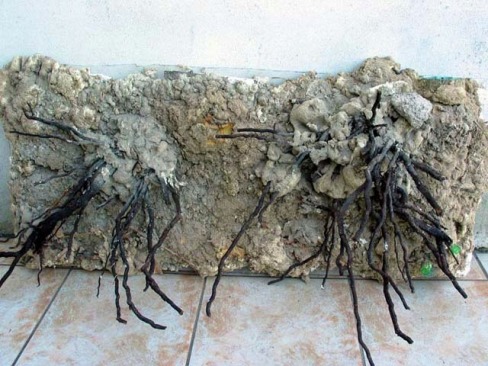
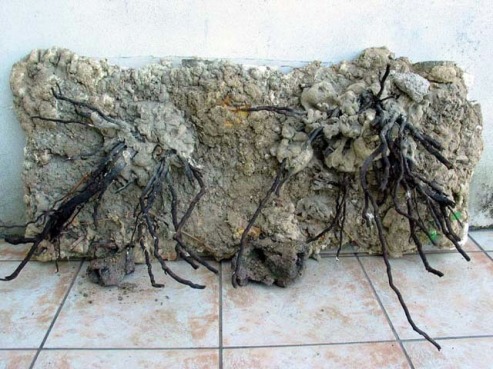
And finally we came to final result. The back wall before being put into the tank looks like this.
With the final touches I managed to change to tone of the joining areas of the roots making it uniform with the rest of the wall.
With the final touches I managed to change to tone of the joining areas of the roots making it uniform with the rest of the wall.
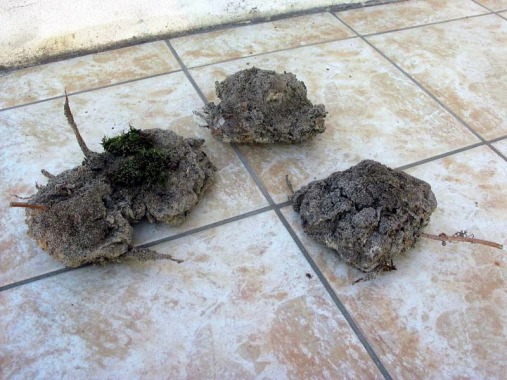
With the same procedure I had used to create the Antibodi’s wall I created some rocks to give a sense of continuity with the back wall.
Over a plastic bag I assembled the materials to use for the mix, therefore more grayish quartz sand, some pieces of lava rock, leaves and dry branches, pieces of polystyrene, small rocks and the ever present polyurethane.
Remember to enclose within the paste or at the bottom a rock heavy enough to keep the created rock at the bottom of the tank, otherwise when you will add the water it will float to the surface (I used a plastic container to make a few attempts during the process).
I mixed the various components breaking the leaves and I sprayed the polyurethane. The overall size was that of an apple. I mixed it, punching slightly with my fingers, adding sand and waited for the polyurethane to dry, 10/15 minutes are enough.
After about 10 minutes the plastivel had made the rocks rather solid already, but to be on the safe side I didn’t touch them till the following day.
With this method you can create endless forms to furnish your tank. Not only back walls, but also group of rocks, plant supports, hiding places for instruments or the aquarium living guests.
Final touches before putting the wall in the tank. I cut the extra pieces of polyurethane that were sticking out using a normal knife.
Then I rinsed it all with a garden tube, and I let it dry against a wall.
Then I rinsed it all with a garden tube, and I let it dry against a wall.
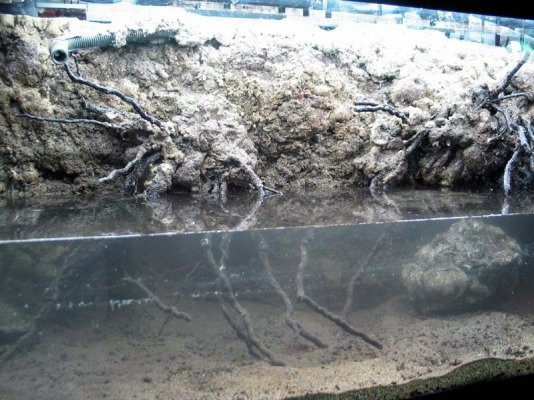
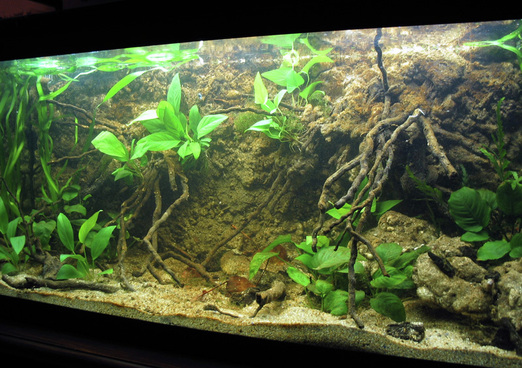
An anticipation of the final layout.
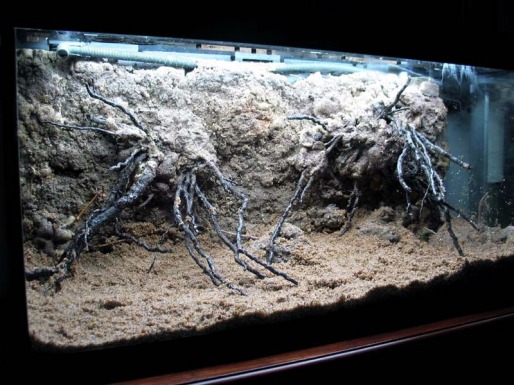
With some precaution I put it in the tank, and I was glad to see that it fitted perfectly. I have to admit that when I turned the lights on I was struck by the fact that it looked really nice and realistic under the neon lights.
The out-tube of the external filter that can be now seen running at the top of the wall will be hidden later. I will spray it will a small amount of polyurethane, that I will cover, the way I did for the rest, with quartz sand mixed with lava powder.
Then, if it will be necessary the water will not arrive up to there, I will cover it all with plastivel.
I could have inserted the tube in the overall wall before, I recommend you to think about is when working.
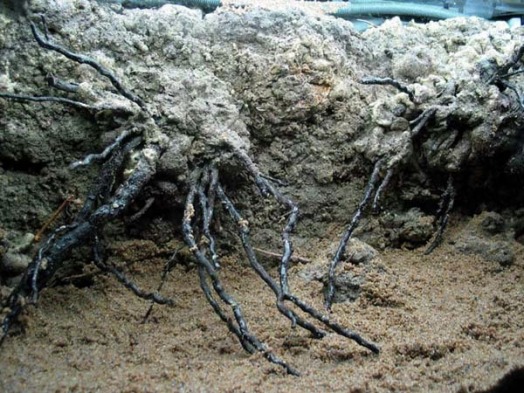
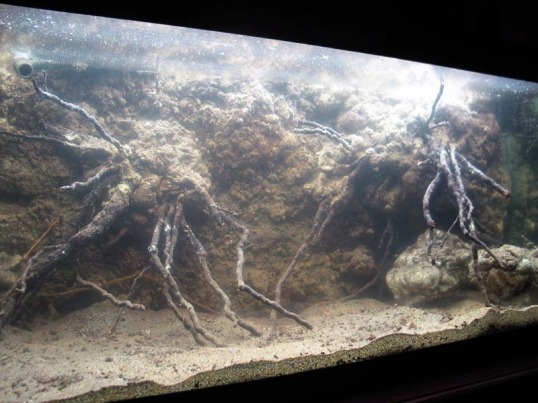
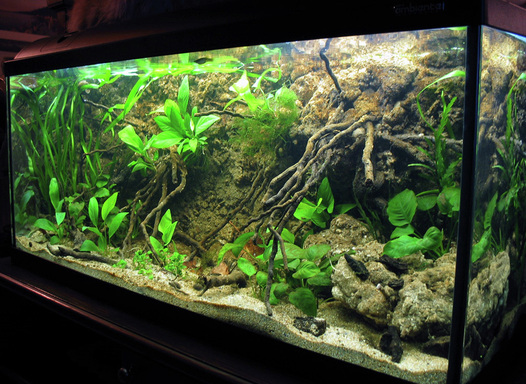
In this photo, that show some details of the wall, you can notice the choice of not using for the back the same materials I used for the wall, since I thought that a small difference in the tone of color could be beneficial to the overall look, even though (the way it happened to me with other fish tanks) the back wall will change in time, and the addition of other materials or the dwellers themselves will change the look and the composition.
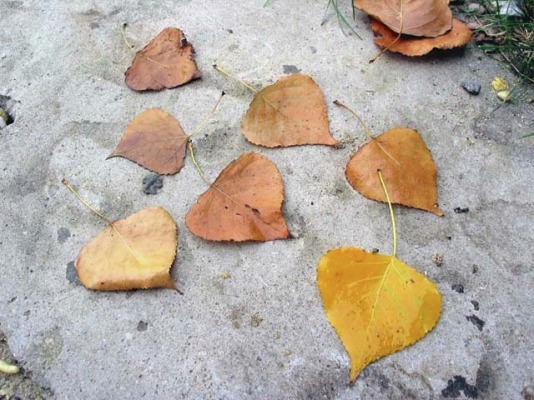
Another small attempt I made to make the wall as realistic as possible was to use different dried leaves, with different colors, covered with plastivel, to allow them to last a long time in water and avoid rotting.
The leaves are poplar’s, a type of wood I had already used in the past.
The leaves are poplar’s, a type of wood I had already used in the past.
The tank is 180 liters and has 2 neon tubes of 30 watts each. I changed the lights by inserting another neon (20 watts), not so much to increase the overall power, but to create a sort of dusk and dawn effect. I always though that a sudden change in lighting will stress the fish, so I set the extra neon tube in order for it to start and stop working about half an hour before and after the others.
It is a nice effect, believe me, not too difficult to made, and not too expensive either, there are countless options to choose from.
It is a nice effect, believe me, not too difficult to made, and not too expensive either, there are countless options to choose from.
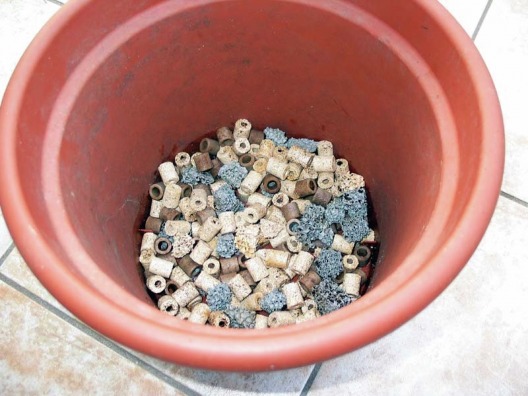
The aquarium is equipped of an external filter, in photo you can notice the materials
I took those two photos immediately after adding water to the tank, therefore it is not too sharp, because the water was still full offloating particles, but I wanted to show the real birth of the tank, the turning on of the filter and the heater!
At the bottom I put some fertilizing material covered by thin amber and gray sand, with some lava material spread around.
At the bottom I put some fertilizing material covered by thin amber and gray sand, with some lava material spread around.
Part II: the biotic.
The plants.
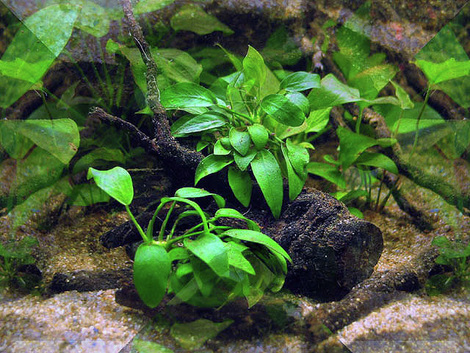
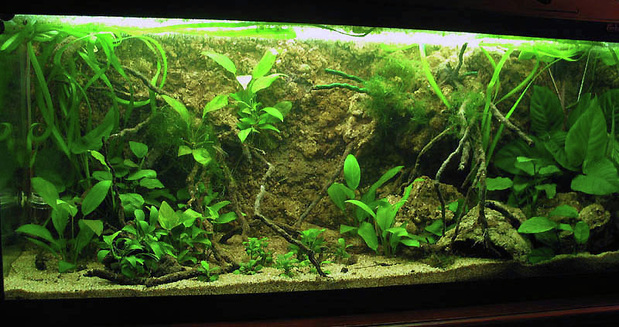
Plants are various Anubias, Crinum, and musk and fish are Pelvicachromis Taeniatus.
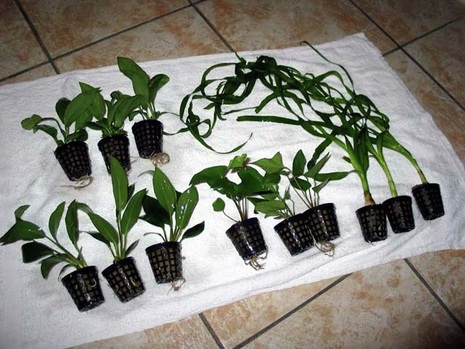
Some of the plants of Antibodi's tank.
We know that Anubias are also epiphyte plants like Bolbitis, Microsorum and others, so I blocked them to the back wall using plastic hooks, that I stuck by pressing in the polyurethane.
We know that Anubias are also epiphyte plants like Bolbitis, Microsorum and others, so I blocked them to the back wall using plastic hooks, that I stuck by pressing in the polyurethane.
Two little Anubias on a piece of wood.
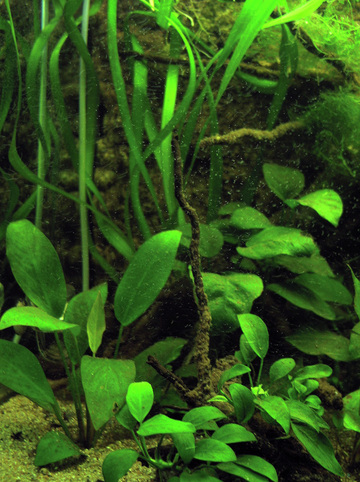
The beautiful green leaves of the Crinum Thaianum and some Anubias.

The great Anubias Bartheri on the right of the tank.
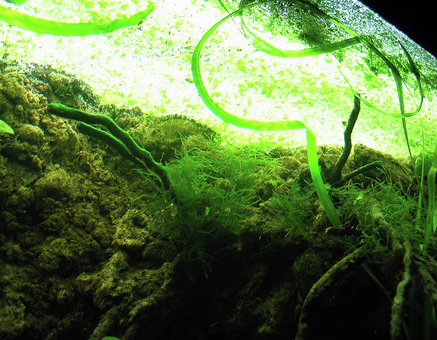
Musk and Lemna Minor.
Fish and invertebrates.
A couple of Pelvicachromis Taeniatus and two snails Neritina Natalensis living in the aquarium.
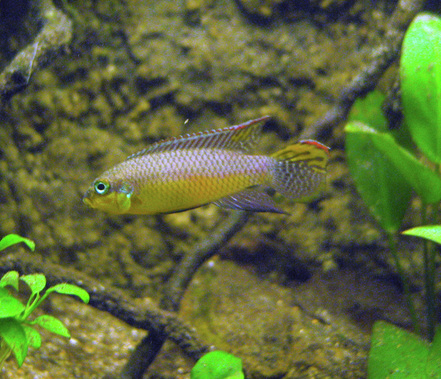
The male of Pelvicachromis Taeniatus and its amazing colors.
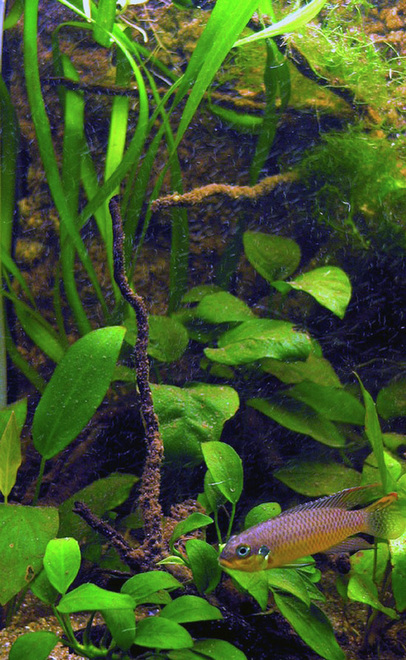
The male with some Anubias in the background.
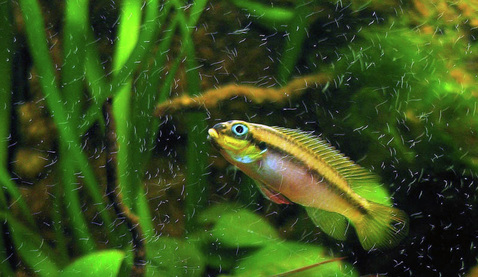
The female of Pelvicachromis with its bright colors.
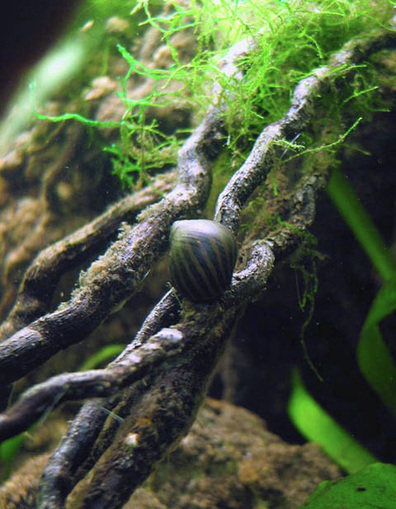
A Neritina Natalensis on a root...

...and another one on Antibodi's rock.
This aquarium has given me much satisfaction; although I had to stop this beautiful adventure fo renovation of my house.
At the end some photos of Antibodi and its short evolution.
At the end some photos of Antibodi and its short evolution.
Here I had just placed the first Anubias Bartheri, musk and Bolbitis. Poplar leaves lying on the ground.
I bought many other plants and, after being placed in the tank, this is the first result.
The second result.
I decided to build a "house" for the Pelvicachromis. So I used natural materials mixed polyurethane to cover a clay pot.
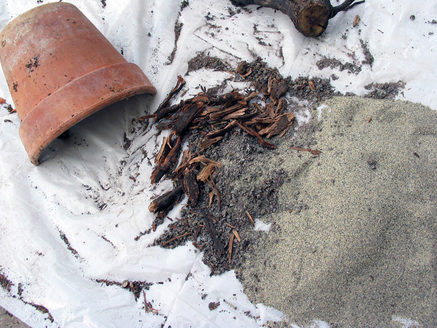
The natural materials: gray sand, little broken roots, volcanic lapilli and a clay pot.
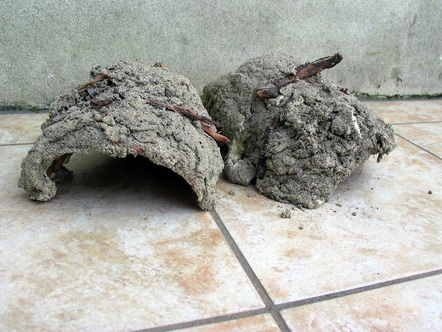
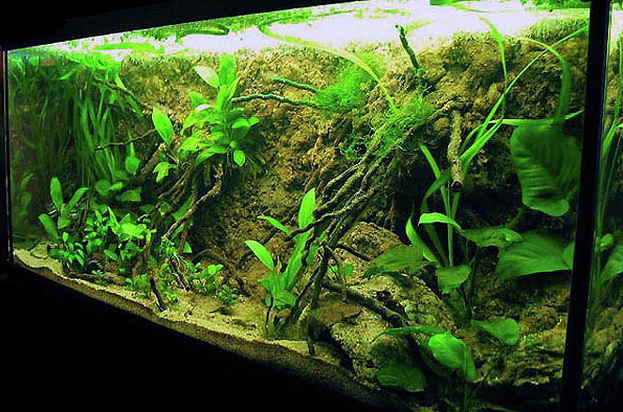
The last result is what you see in the picture.
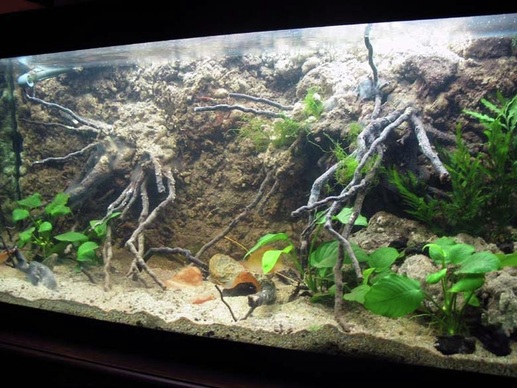
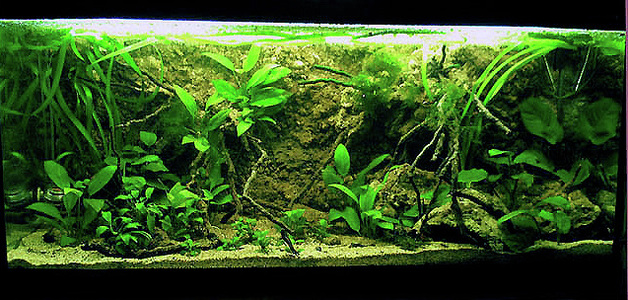
A shot of the tank.
Another one.
Thanks for reading about my work and for your interest. I hope to be able in the future to keep describing the evolution of Antibodi, an aquarium that is providing me with a lot of pleasure.
If you want to see more pictures about "Antibodi" aquarium click on the italian version of the article.I would want to say thanks to Paolo (nick name Paolo61) in order to have translate this article.
If you want to see more pictures about "Antibodi" aquarium click on the italian version of the article.I would want to say thanks to Paolo (nick name Paolo61) in order to have translate this article.
Links on the project "Antibodi"
Link to "AcquariForum":
http://www.acquariforum.com/forum/showthread.php?t=10824weeblylink_new_window
Link to russian "Diesel forum":
http://diesel.elcat.kg/index.php?showtopic=3183127weeblylink_new_window
Link to "Acquatic Plant Central"
http://www.aquaticplantcentral.com/forumapc/aquascaping/35284-antibodi-journey-between-nature-aquarium.htmlweeblylink_new_window
Link to a post by AGA member "Jerry Smith":
http://forum.aquatic-gardeners.org/viewtopic.php?t=775weeblylink_new_window
Link to a brazilian site for the aquarium of the month:
http://www.infoaqua.com.br/galeria022009.htmlweeblylink_new_window
Link to "Aquaticquontient":
http://www.aquaticquotient.com/forum/showthread.php/25250-Antibodi-Journey-between-Aquarium-amp-Natureweeblylink_new_window
Link to "Tropical fish forums":
http://www.fishforums.net/index.php?showtopic=166819&st=0weeblylink_new_window
